It’s a well-known fact we spend a considerable chunk of our time typing emails nowadays. In 2015, DMR estimated that the average number of emails an office worker received each day was a staggering 121.
As a freelance translator and interpreter, my numbers have never reached such a level. Still, on some days I may easily find myself clicking the ‘Send’ button more than 20 times.
As a project manager, on the other hand, having 121 new emails in my inbox often means it’s been a relatively quiet day. PMs are in constant contact not only with clients and work colleagues, but also with linguists and other suppliers.
Replying to every single one of these emails, as you can imagine, may take me a good couple of hours I could otherwise spend on other tasks. Many of those emails tend to be quite repetitive too.
To save me some of that precious time and to improve my productivity, since 2017 I have been using a text expander software. This fantastic hack allows me to write in just a couple of seconds a full email that otherwise would take me 5 minutes.
There are several pieces of software like this on the market for different budgets and needs. One of the best I’ve used so far – and the topic of today’s post – is TextExpander.
In this review and tutorial I will cover how TextExpander’s main features and how to use it for productivity improvement. It’s a tool that I believe will be of great help in your freelancer journey.
Please note this post contains affiliate links. I’m a partner with Smile (TextExpander’s developer), which means I may get a small commission if you decide to subscribe to the software through my blog. There will be no extra cost to you at all! 🙂
What Does TextExpander Do?
As mentioned, TextExpander is primarily a time-saving piece of software to speed up any repetitive tasks related to writing. Although I mostly use it for email communication, it can be used for many other things.

Here’s how it works:
- You write your text once and store it in TextExpander’s memory (so it becomes a snippet.)
- You associate a short code (or abbreviation) to that snippet.
- Finally, every time you want to ‘write’ that same, repetitive email, all you need to do is type that short code and hit a pre-selected activation key.
It’s that simple! In just one second you’ve ‘written’ your email.
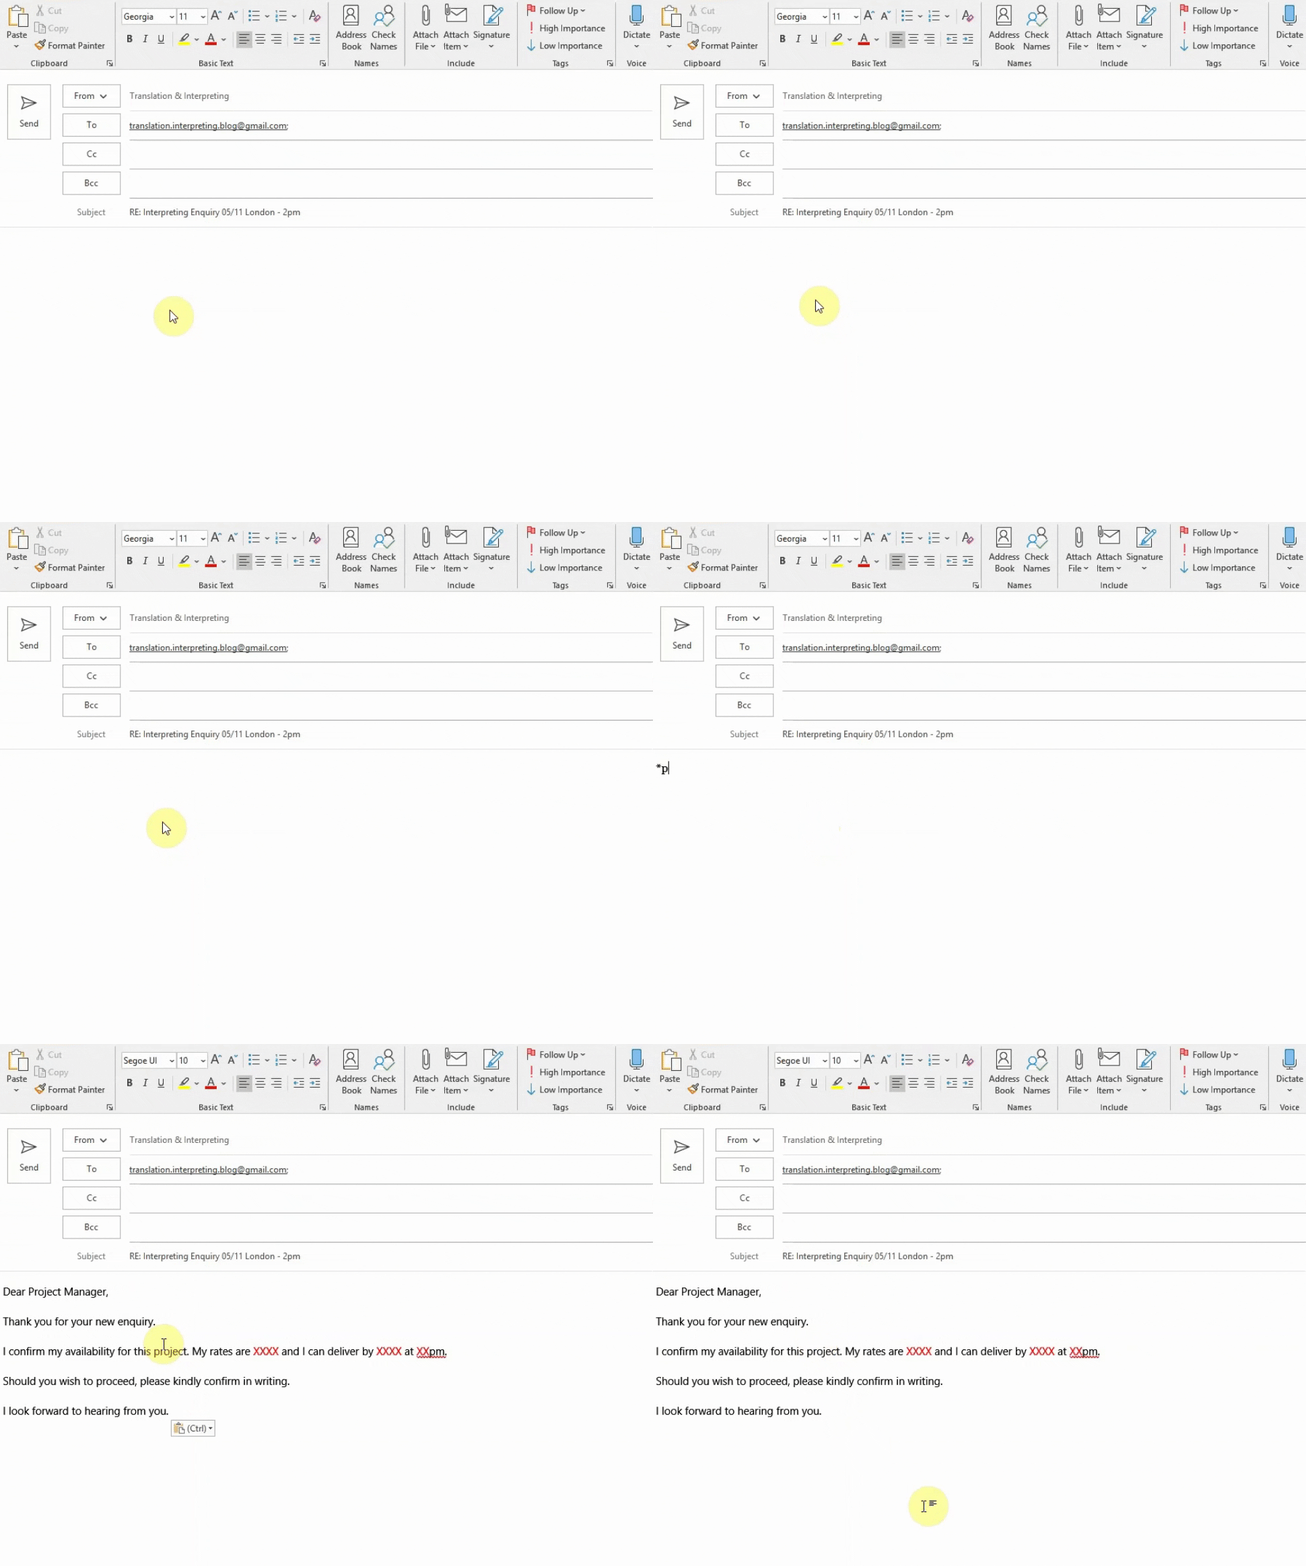
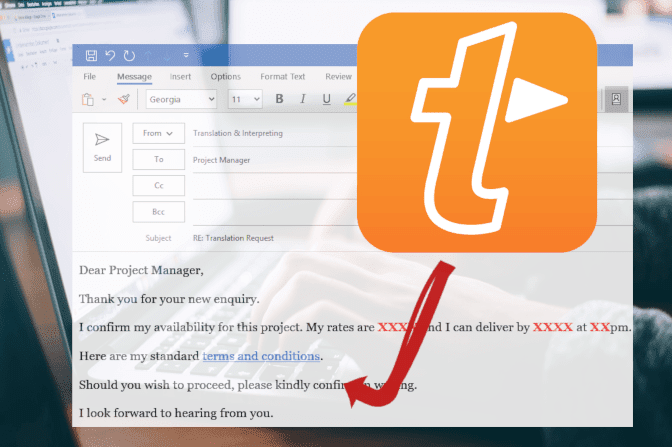
Here’s an example of this ‘magic’ trick being applied. Note how from a short 2-letter code I’ve populated the entire email body without wasting any time:
In addition to full emails, to make your writing process quicker and more flexible, you can also store those super common sentences you include in almost every single email. Some classic examples include:
- «Thank you for your email»
- «I look forward to hearing from you»
- «I confirm safe receipt of …»
- «Received with thanks»
- «Should you need further any assistance, please do not hesitate to contact me again»
- «Thank you once again for trusting me with this project»
- «Kind regards»
That way, you can insert any of the above sentences (and any others you may use frequently) anywhere just by typing 2 or 3 letters.
Why is this important?
Productivity is a freelancer’s bread and butter. Ultimately, optimising your daily usage of time by all means possible will allow you to make more money.
I must have literally saved hundreds of hours of my time since 2017 just by using this simple hack. It has also allowed me to reply to new customer enquiries quicker, which I believe made me win some of those translation projects that follow the infamous ‘first come, first serve‘ logic.
How to Use TextExpander?
As you’ll see below, TextExpander is intuitive, user-friendly and very easy to use.
Note: The below screenshots were taken on a Windows machine, however TextExpander is also available on Mac.
Installation
The installation process is fairly straightforward and not particularly different from any standard software (click here if you’d like to skip this part.)
Nevertheless, there are two important things I’d like to point out:
- TextExpander offers a free 30-day trial with no need to give out any credit card details (it’s totally without obligation.) I always recommend trying out a new tool before purchasing it, so make sure to click the ‘Try It For Free‘ button from the homepage:
- To download the *.exe file you must register your email and activate your account. Having an online account with TextExpander is a requirement for the tool to work (you’ll see why further down in this post.)
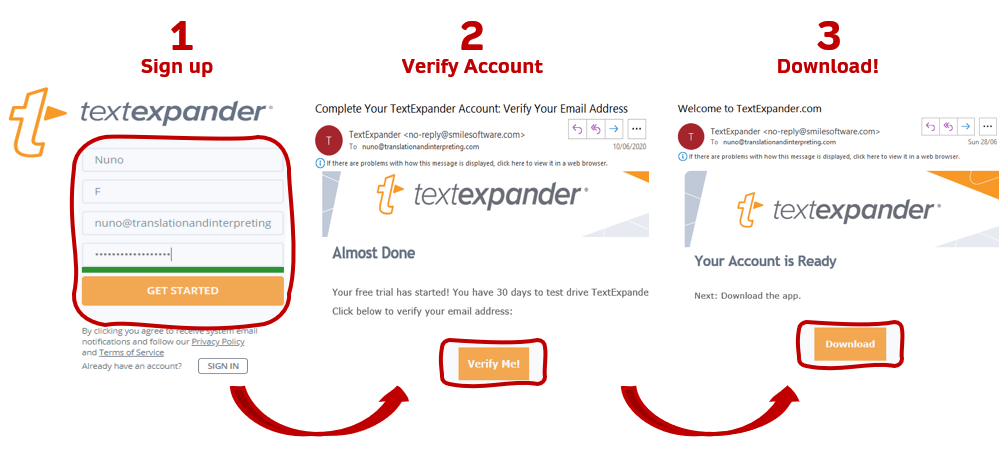
After downloading it, all you need to do is install the application and log in with your account details:
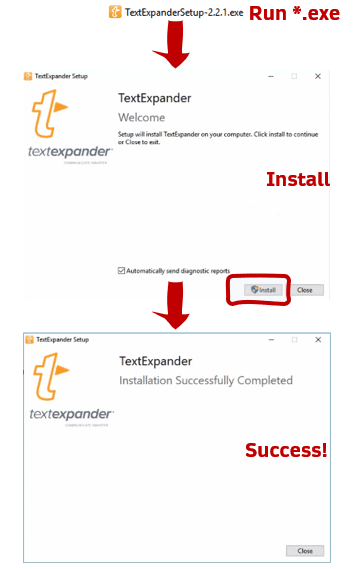
Once you’ve finished the installation you’ll see this new icon on your toolbar:

You can double click it to open TextExpander (it keeps running on the background), otherwise the login window should pop up automatically after the installation:
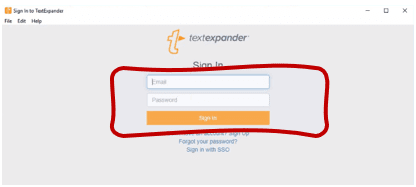
Insert your account details, click Sign in… and that’s it! You’ll be ready to start using TextExpander right after that.
TextExpander Tutorial
Getting Started
The screenshot below shows what you’ll see after you’ve logged in to your account.
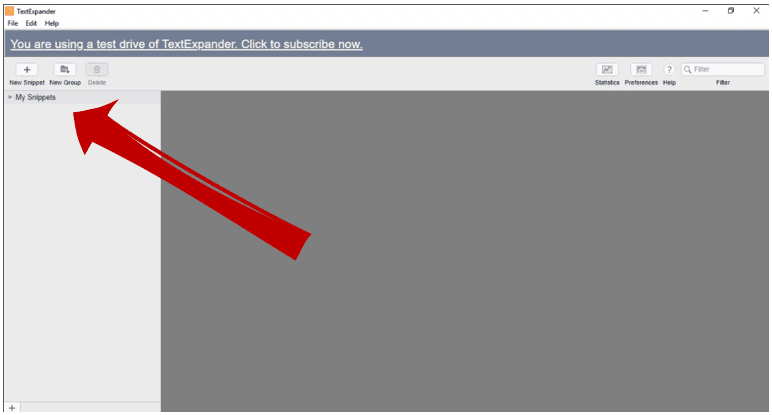
The layout is pretty self-explanatory – it works in an way similar to your browser’s bookmark manager.
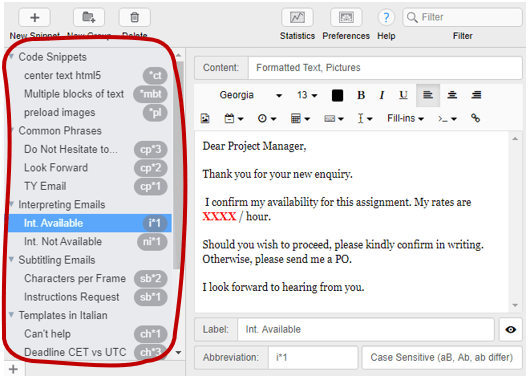
Your list of snippets (i.e., templates) will be displayed and organised on the left-hand side, with the editor being placed at the center.
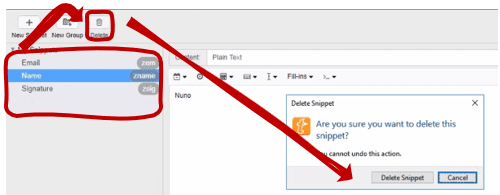
A group named ‘My Snippets‘ will appear by default. Click the small triangle icon ( ) to expand it and you’ll find 3 pre-installed snippets. Feel free to delete these before starting creating your own.

Creating Groups
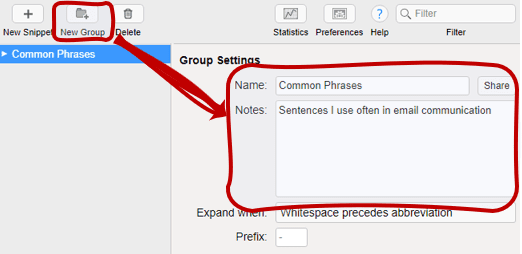
Groups are essentially folders where you can store your snippets by category. Just click New Group and fill up the form:
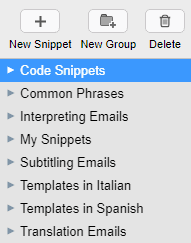
You can create as many groups as you like, there’s no limit to the amount:
Creating and Using Snippets
Now to the fun part! Not only creating snippets is super easy, they are indeed the real ‘gold’ when it comes to boosting your productivity.
Simply highlight the category under which you want to create your snipped and click New Snippet.

Some things to keep in mind when filling up the form:
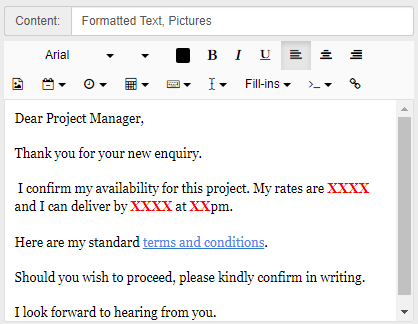
- Content: You can decide whether your snippet is plain text or formatted text (recommended if you intend to format your text with bold, italics, hyperlinks, tables, pictures, select a font, etc.) In addition, you may also store Shell Script, AppleScript and JavaScript snippets.

- Formatted Text: If you go for this option, it allows you to add formatting to your snippet just like any text editor. In my case, I use this a lot to create links (e.g. for my T&C page), price tables with my rates, etc.
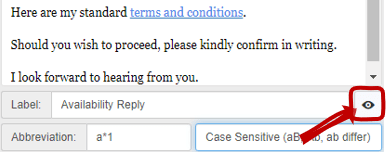
- Labels: Give each snippet a name that relates to its content. This will become invaluable when your snippet catalogue gets to a considerable size.

- Abbreviation: This is the crucial section that will make the ‘magic’ work. Assign an abbreviation (short code) to your snippet and trigger the entire text whenever you want by simply typing the abbreviation followed by the activation key (more on this in a moment). In my example, I’m instructing TextExpander to trigger my snippet when I type a*1.

- Preview: There’s also a preview button on the bottom right that allows you to see how your snippet will look like. Alternatively, you may simply start writing a new email and test it by yourself.
From this point onward you can create as many snippets as you need – there’s no limit to how many you can store in TextExpander.
Then it’s just a matter of using the abbreviations whenever you need to trigger your snippets:
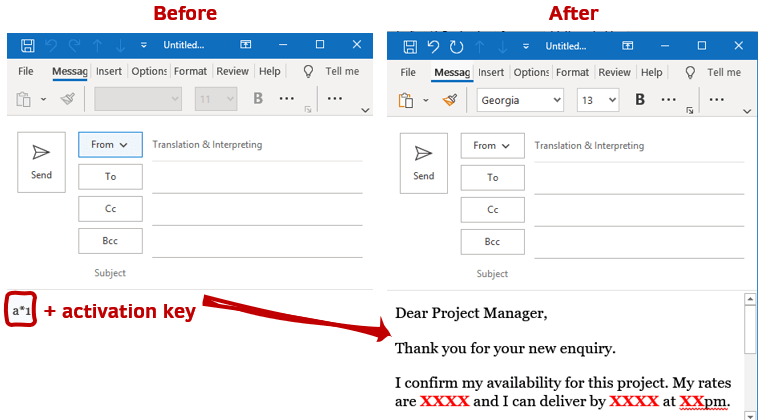
As you see, TextExpander is easy to use and will save you an incalculable amount of time over the long run. The more snippets you store over time, the more time you end up saving.
Preferences
Like any software, TextExpander allows you to adjust your settings under Preferences:

The Expansion tab allows you to choose an activation key (better known as ‘delimiter key‘.)
In other words, that’s the key(s) on your keyboard that will trigger the snippet after you’ve typed an abbreviation. You select this by clicking Set Delimiters.
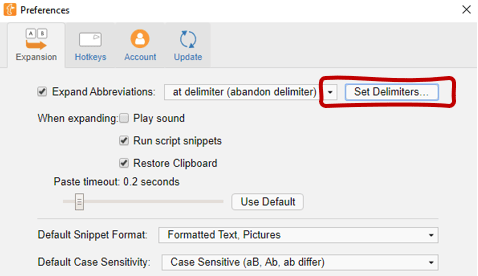
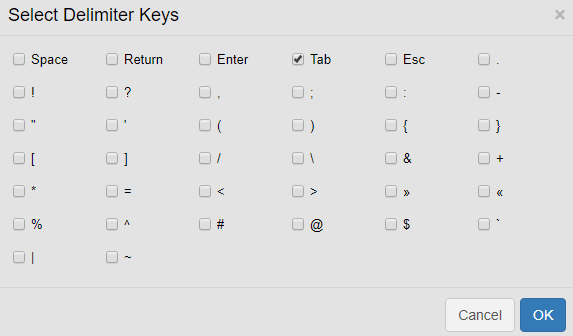
I like to use the Tab key, but there’s plenty of options to choose from. Just do whatever works for you (you may even select more than one delimiter.)
Additionally, the drop-down menu left of Set Delimiters lets you determine the behaviour of your snippets once you’ve hit a delimiter key to trigger a snippet.
You may even set to ‘immediately when typed‘ if you don’t want to use a delimiter key at all: this will simply expand your snippet right after you’ve typed the abbreviation.
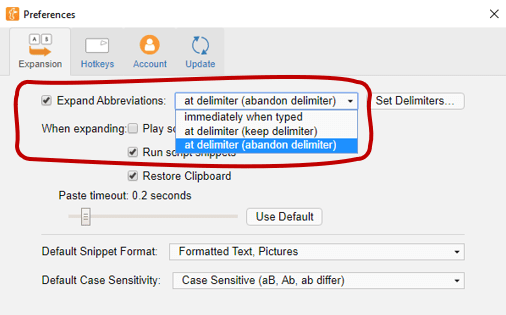
Personally, I prefer having it set to delimiter (abandon delimiter), as I feel it gives me greater control over the snippets.
Finally, you can also decide:
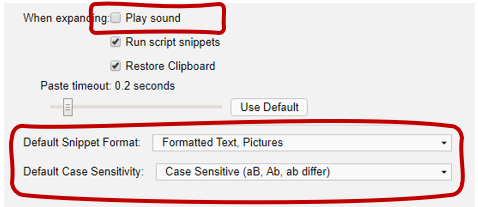
- Sound: whether to play a sound whenever you expand a snippet (I always switch this off)
- Format: choose between Plain Text and Formatted Text
- Case Sensitivity: whether your abbreviations are case sensitive or not
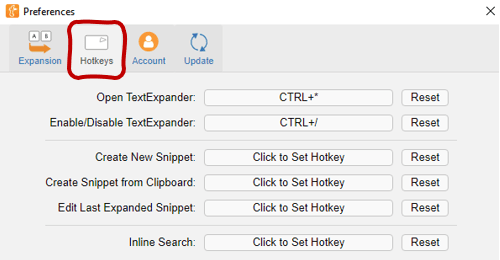
If you like using Hotkeys, there’s also a tab for that. For instance, I’ve set Ctrl+* to open TextExpander and Ctrl+/ to disable and enable it:
Note: TextExpander works perfectly fine if you keep the default preferences, so you don’t have to change anything. However, being able to personalise the tool is something I always find important.
Pricing
As already mentioned, I strongly recommend you to download the trial version in order to get acquainted with the software – there simply isn’t a better way to determine whether it suits your needs.
If you are happy with the tool once the initial 30-days have run out, keep in mind TextExpander offers 3 different plans: Life Hacker, Team and Enterprise.
Personally, I recommend the most basic plan (Life Hacker) for freelancers; unless you are a team leader, this should have everything you need.
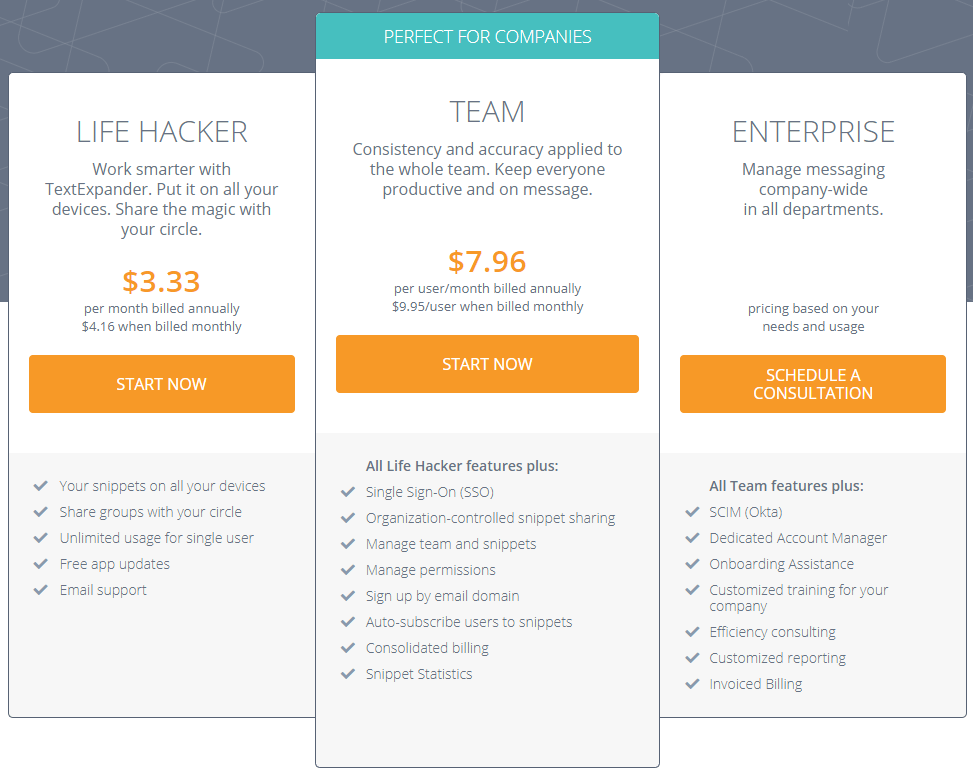
TextExpander’s Life Hacker plan is fairly affordable, costing only $3.33 per month when billed annually ($39.96/year). At this cost, it’s definitely a tool worth subscribing to… but you can get it for even cheaper!
Get 20% Off Of Your Subscription

To get an even better deal, just follow my affiliate link to get TextExpander 20% off. This comes with full access to TextExpander and includes technical support.
If you’ve found this post helpful or think it could be useful to a friend who perhaps is – or is planning to become – a translator or interpreter, please kindly consider buying me a coffee by using the button below:
I put all my heart and soul into the content I produce in order to help my fellow linguists set foot in the industry. Most of what I do is available to everyone for free.
Donating is 100% optional, but greatly appreciated. A short espresso will do! ☕



 4 Best Text Expanders For Productivity Improvement


